Creating PHP MYSQL Master / Deatils forms using Smart Form Maker
The newest version of Smart Form Maker creates PHP MYSQL forms in master/detail layouts (sub-forms) . This new feature allows you to create relationships and analyze the details of a particular record with ease.
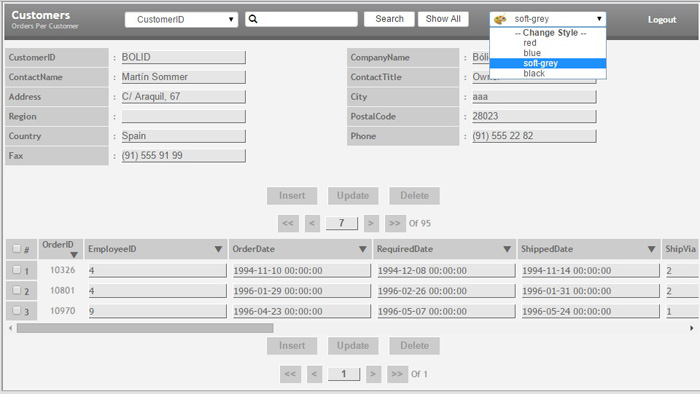
In this tutorial we want to build an orders per customer form where you can manage the information of your customers and their orders using just one form!
Lets assume you have a database with two related tables :
- “Customers” : For saving the contact information of your customers. It has a primary key column “Customer_ID” .
- “Orders” : For saving the orders data. Please note that “Customer_ID” will be a foreign key in this table.
in this example the “Master” form should be for the customer’s information and the “Details” form should be for listing the orders of each customer record loaded in the “Master” form.
How to instantly create this master / details form using smart form maker ?
Building this PHP MYSQL form using smart form maker should be very easy, by following the following simple steps:
1) Start by creating establishing a connection with your MYSQL DB, using the connection step of Smart Form Maker.
2) Since the customers form in our tutorial is the master form, then we should select the “Customers” table as the “data source”.
3) In this tutorial we want to create a form to insert, update, navigate and delete records from both customers and orders tables, so we will select all form actions, Then we should click “Next” to move to the next step in the form maker wizard.
4) In the “Fields” step we should select the fields that we want to show in the master form. Please note that you may find some fields in a red color, they are already chosen by Smart Form Maker because these fields doesn’t allow null values so they will be included in the form by default. after selecting the master form fields, we should click “Next” to proceed to the next step.
5) In this “Settings” step we can control the settings of the master form fields, for example we can :
- Give meaningful labels to the fields.
- Select the required fields.
- Set validation rules.
Then we should click “Next” to proceed to the next screen .
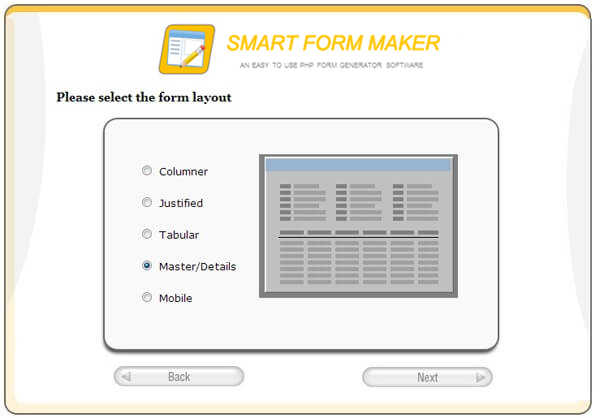
6) in the “Form type” step , we should select the “Master/Details” form type.
7) Once selecting the “Master/details” form type a new window should appear. Using this window we need to define the following :
- The data source table of the detailed form (The orders table in this tutorial)
- The joining column (The “customer_ID” column in this tutorial)
8) Similarly, we should be able to customize the detailed form by selecting its columns, labels, validation rule, as we did with the master form.
4) Your PHP MYSQL form should be something like the following image
Related Links:
Smart Form Maker home page
Smart Form Maker Demo version
Video tutorials