Smart Report Maker includes a powerful module for creating MySQL and MariaDB pivot tables using an incredibly easy-to-use drag-and-drop editor. This module is designed to save you time and effort while giving you full flexibility. Whether you need to summarize sales data, analyze user activity, or break down performance by category, the pivot table builder helps you do it all — without writing a single line of SQL.
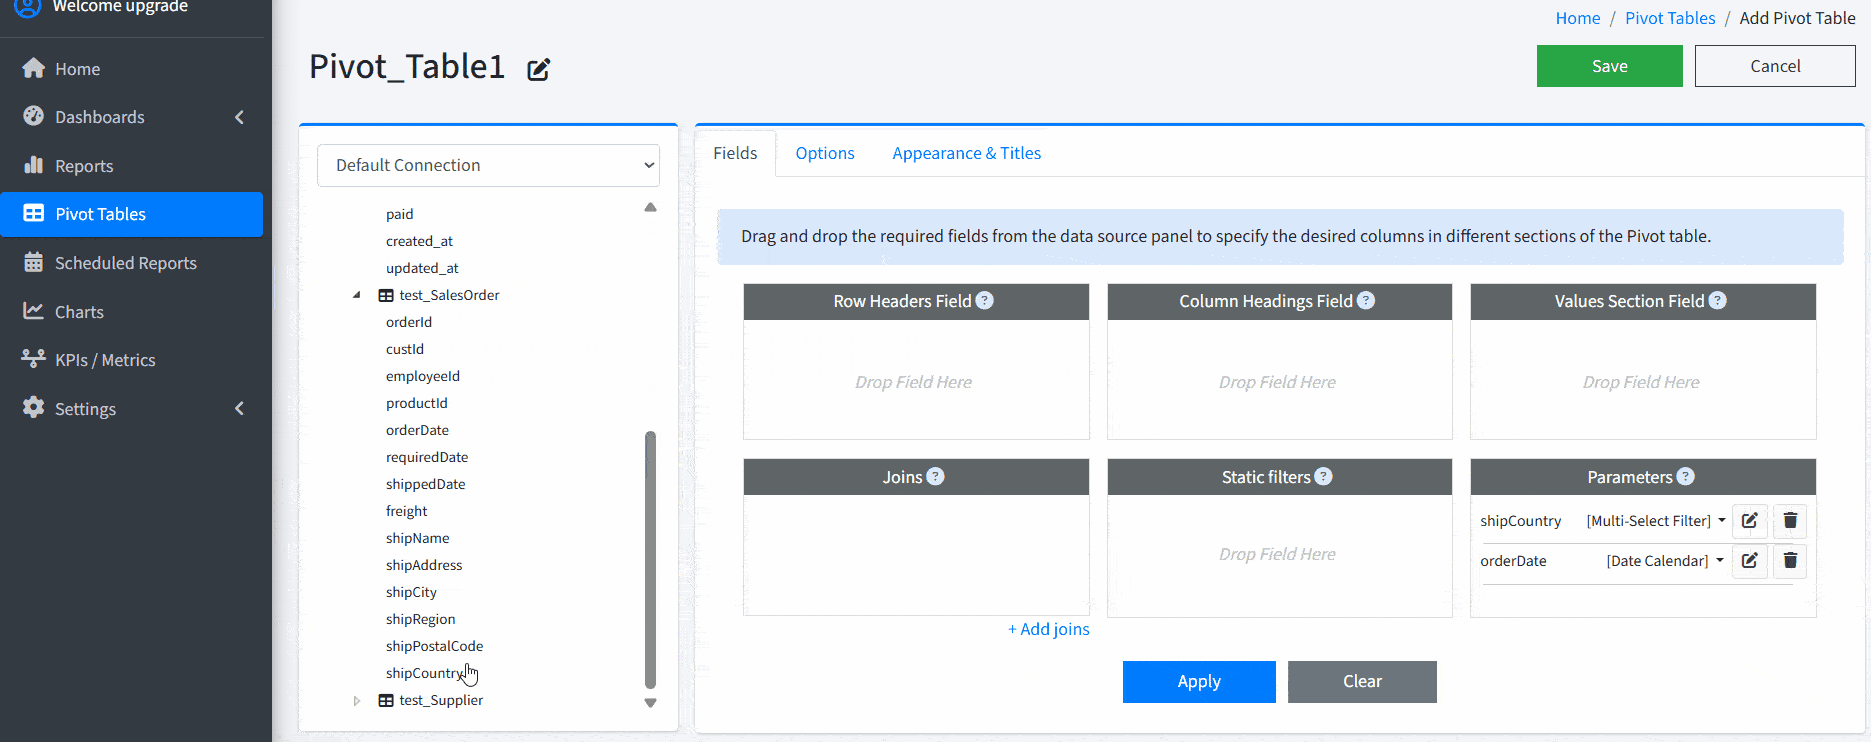
Creating pivot tables for MySQL has never been easier. The intuitive drag-and-drop interface allows users to assign database fields to the “Rows,” “Columns,” and “Values” sections effortlessly. There’s no need to write SQL queries — just point, drag, and drop to create complex PHP pivot tables that provide instant insights.
For example, if you want to analyze monthly sales by region, you can simply drag “Region” to the Rows section and “Date” to the Columns. Then, group the date field by Month and set “Sales Amount” as your value. Instantly, your MySQL pivot table will display a detailed month-by-month sales breakdown for each region.
Even better, you can enable yearly subtotals and grand totals — giving you not only the performance of each month, but also the total sales per year and the overall total at a glance. This makes it incredibly easy to identify trends, compare performance across time periods, and make data-driven decisions — all without writing a single line of SQL.
SRM allows you to define interactive parameters, enabling end users to change filters on the fly. This brings your cross tabulation to life — letting users view data by date range, location, product, or any custom field they choose.
Example: Let a sales manager filter the pivot table by year or salesperson using dropdowns or date pickers embedded directly in the report.
Parameters can be shown to users using intuitive input elements like calendar date pickers, multi-select dropdowns, range sliders, and search boxes. This interactivity turns a static PHP pivot table into a powerful exploration tool for your MySQL database.
When working with multiple tables, SRM automatically detects relationships between them based on foreign keys. This feature is especially helpful when you’re building pivot tables from normalized databases. You can also manually adjust relationships if needed, giving you full control over how your data is joined and displayed.
You can apply fixed filters using the same drag-and-drop interface to limit the data shown in your pivot table. This is perfect for focusing on specific timeframes, categories, or customer segments. By filtering out unnecessary rows, your PHP MySQL pivot table remains clean, relevant, and accurate.
When using date fields in your pivot table, you can group data by year, quarter, month, weekday, or time. This makes it simple to generate time-based reports, such as annual trends, quarterly comparisons, or weekday performance breakdowns — a vital feature for time-series cross tabulation in MySQL.
You can automatically display subtotals for grouped periods (e.g., quarterly data with annual totals). This gives stakeholders the context they need when analyzing performance over time.
Choose whether or not to display grand totals for rows and columns. This flexibility ensures your PHP MySQL pivot tables show just the right level of detail — no more, no less.
SRM includes a variety of professionally designed templates that you can customize to fit your brand. Change table titles, number formats, currencies, and units of measurement to ensure consistency across your reporting environment.
Export your reports in different formats so you can share them with colleagues, include them in presentations, or archive them offline.
Pivot tables can be made public or restricted to specific user groups. This access control feature is ideal for sharing insights securely across teams or departments while maintaining data privacy.
SRM supports a wide array of aggregation functions including:
These enable advanced MySQL cross tabulation and flexible business analysis — all in a visual, code-free environment.
Hide or show specific columns as needed to simplify your view or highlight key metrics. This is especially useful when dealing with large pivot tables where not all data is always relevant.
Embed your pivot tables directly into SRM dashboards alongside other reports and KPIs. This provides a centralized view of your business metrics, updated in real-time.
The pivot table editor is optimized for performance, handling large datasets smoothly and rendering reports quickly — even when dealing with complex MySQL cross tabulations.
A: Yes. Smart Report Maker allows you to build powerful MySQL and MariaDB pivot tables using a drag-and-drop editor, without writing a single line of SQL. You simply select fields and assign them to rows, columns, and values to generate insights instantly.
A: The pivot table builder uses an intuitive drag-and-drop interface where you move database fields into Rows, Columns, and Values areas. Smart Report Maker automatically handles grouping, aggregation, and calculations, making it easy to create complex pivot tables visually.
A: Yes. Smart Report Maker allows you to group Date and DateTime fields into years, quarters, months, weekdays, days, or hours. This makes it easy to create summary reports such as sales per month, quarterly performance, weekday trends, or hourly breakdowns.
A: Yes. When working with multiple tables, Smart Report Maker automatically detects relationships based on foreign keys. You can also manually adjust or define relationships to control how data is joined in pivot tables.
A: Smart Report Maker supports two types of filters when building pivot tables. Static filters are defined by you at design time and apply fixed conditions to the data. Dynamic filters (parameters) are defined by end users at runtime, allowing them to filter data interactively. Parameters can appear as text boxes, date pickers, time sliders, multi-select dropdowns, and other input controls. Both filter types are created using the same drag-and-drop editor, with many supported filter options and display styles.
A: Yes. You can define interactive parameters that allow end users to filter pivot table data dynamically using dropdowns, date pickers, sliders, or other input controls, enabling flexible, real-time analysis.
A: Yes. Smart Report Maker allows you to hide or show columns, reorder fields, and adjust layouts to simplify large pivot tables and highlight only the most relevant metrics.
A: Yes. Smart Report Maker allows you to embed PHP MySQL pivot tables securely into your own PHP applications. Embedded pivot tables remain fully interactive and support filtering and drill-down.
A: Yes. You can customize pivot tables by selecting from built-in themes, changing titles, hiding or showing columns, adjusting text alignment, formatting values, and choosing whether to display subtotals or grand totals.
A: You can try the Pivot Table Builder directly in the online demo version of Smart Report Maker . You can also watch this video tutorial to see the feature in action .
Building PHP MySQL pivot tables is easier and more powerful than ever. Whether you’re visualizing sales trends, analyzing support tickets, or summarizing operational KPIs, the new module empowers you to turn raw data into meaningful insights. It’s the perfect solution for creating dynamic, interactive pivot tables for MySQL — all with drag-and-drop simplicity.