Integrate created reports with Smart Report Maker into your software projects
In this tutorial, we’ll show you how to integrate Smart Report Maker reports into your software project in a few simple steps. Furthermore, we assume that you do not want your users to have to log in twice to view your reports. Therefore the reports should be secured exclusively by your project’s login system.
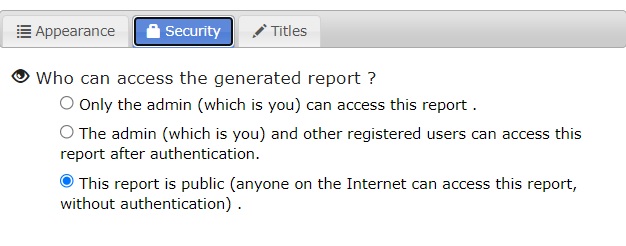
Generate the reports you need, and make sure they are public reports!
To integrate the generated report into your system without the need to log in twice, you need to set the security of these reports as ‘public’. This can be done while generating the reports by selecting “This report is public” from the security tab in the settings step of the wizard.
Moving the reports to your product (Optional Step).
After generating all the reports, we may need to move them physically to your software project. For the sake of this tutorial, we will assume you are using the latest version of Smart Report Maker, which is version 8, so all your generated reports should be found at /SRM8/SRM/Reports8/ as subdirectories we will call this directory the “Reports” directory.
If you need to move all your reports into your product, you can copy the reports directory to your software project. Yet, if you need to move only one or more reports then, you should copy the subdirectories of these reports (which existed in the reports directory) along with the “shared’ directory which can be found at /SRM8/SRM/Reports8/shared/. Please make sure that the shared directory and the subdirectories are in the same directory in your project.
Integrating the generated reports with your existing security system.
In this step, we need to integrate the reports with your project’s security system. This will require adding some code to the reports to integrate with your security system and the ideal place to add this code is at:
- ‘/SRM8/SRM/Reports8/shared/helpers/lib.php ‘ If you are integrating all generated reports.
- ‘/SRM8/SRM/Reports8/rep{Your-report-name/auto_load.php’ if you are integrating a single report.
For the sake of this tutorial, we will assume your project has a session-based security system which means your system checks the existence and/or the value of certain session key(s) to grant any access to your system. As an example, let’s assume that your system checks the existence of a session key such as “user_id” and the value of another session key such as “group_id” to make sure it equals 5 or 6. In this case for a user to access the report:
- His session should contain the two keys $_SESSION[“user_id”] & $_SESSION[“group_id”] should be existed
- The $_SESSION[“group_id”] must equal 5 or 6
In this example, the integration code should check the above two rules! If they are met the user should access the report otherwise, they should be redirected to your security system’s login page which should have its URL. The code should look like the following:
if ( !isset($_SESSION["user_id"]) || !isset($_SESSION["group_id"]) || !in_array($_SESSION["group_id"], array(5,6)) )
{
    header('Location: https://some-domain/your-project/your-login-page');
    exit();
}
Knowing what session keys to check and the URL of the login page of your security system will do the trick.
Testing your work!
It is important to test your work by:
- Trying to access the report without a successful login to your security system and making sure that you are redirected to your project’s login page.
- Try to access the report after a successful login to your security system and make sure you can successfully access the report.
Finally, if you are a web developer and want to control report generation from your project code, please know that Smart Report Engine can do just this. For more details click here.
Summary
You can integrate reports you generate by Smart Report Maker into your reports in a few simple steps:
- Generating public reports
- Moving the reports directory to your product
- Integrating the moved reports with your existing security system.
- Testing the integration.