In this post, we will cover how to install Smart Report Maker via Composer. The process is divided into the following sections:
- Preparation for Smart Report Maker Installation: This section outlines the steps required to prepare for installing Smart Report Maker on both Linux and Windows systems.
- Installing Smart Report Maker on Windows: Instructions for installing Smart Report Maker on Windows systems.
- Installing Smart Report Maker on Linux: Detailed steps to install Smart Report Maker on Linux distributions such as Ubuntu, Fedora, Debian, Red Hat, and CentOS.
Smart Report Maker provides an installation script tailored for each environment, including Linux and Windows. It automates the setup process across various Linux distributions like Ubuntu, Fedora, Debian, Red Hat, and CentOS, with support for both Apache and Nginx as web servers.
Preparation for Smart Report Maker Installation
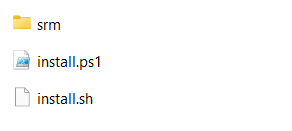
1- After purchasing and downloading the full version from our download area, navigate to the directory matching your server’s PHP version, where you will find the following files and directories:
- The
srmdirectory, which contains the system files. install.sh, a shell script that automates Smart Report Maker installation on Linux systems.install.ps1, a PowerShell script that automates Smart Report Maker installation on Windows systems.
2- Upload only the “srm” folder along with the appropriate installer script (Linux or Windows) to your server. Make sure you place them in your chosen installation directory inside the web root (e.g., public_html, htdocs, or www), so SRM can be accessed via a browser.
Important: To successfully install Smart Report Maker (SRM) and access it from your browser, please ensure the following two conditions are met:
- Upload the “srm” folder and the correct installer script (for Linux or Windows) to a web-accessible directory — this means placing them inside your server’s web root (e.g.,
public_html,www, orhtdocs) so they can be accessed via a browser. - Ensure that the “srm” folder and the installer script are placed at the same level within the installation directory.
For example, if your installation directory is/var/www/htmlon a Linux server, the correct structure should be:srmfolder at/var/www/html/srm- installer script at
/var/www/html/install.sh
 Smart Report Maker Installation on Windows
1-Ensure that all steps in the “Preparation for Smart Report Maker Installation” section have been successfully completed.
2- Temporarily Disable Your Antivirus Protection. Based on our experience, firewalls or antivirus software may sometimes block Composer from installing dependencies.
- Open your antivirus software (e.g., Bitdefender, Avast, Kaspersky, Norton).
- Locate the option to pause or disable protection — look for labels like “Pause Protection,” “Temporarily Disable Guard,” or “Turn Off Real-Time Protection.”
- Choose a time duration (e.g., 10 minutes, 1 hour) and confirm the action.
3- Run your PowerShell command prompt as an administrator by following these steps:
- Press the Windows key and type “PowerShell.”
- Right-click on Windows PowerShell from the search results.
- Select Run as administrator from the context menu.
4- Change to the installation directory containing both the “srm” folder and the install.ps1 script:
cd "C:\path\to\installation\directory"5- Set the PowerShell Execution Policy and run the script:
powershell -ExecutionPolicy Bypass -File .\install.ps1If you encounter an error when running the previous command, please try the following steps:
- Rerun the script by executing the same command again. Sometimes, errors occur due to temporary issues with downloading certain packages.
- Verify that the
srmfolder is placed inside your web server’s root directory, and that both thesrmfolder and theinstall.ps1script are located in the same directory. - Disable your antivirus temporarily and run the installer again using the same command.
- Ensure you’re using PowerShell with administrative privileges.
Once you run the installer, it will perform the following tasks:
- Search for the path to
php.exein common locations. If it’s not found, you will be prompted to manually enter the path. - Check if Composer is installed. If Composer is available, it will use it; otherwise, it will install Composer and its dependencies.
- Create the necessary symbolic links (soft links).
- Execute all necessary commands to install Smart Report Maker’s dependencies using Composer.
- Adjust the directory permissions as required.
6- Once the installer finishes and displays a success message with zero errors, delete the installer script
Remove-Item -Path ".\install.ps1"7- Open your preferred web browser and navigate to https://domain_name/path-to-srm/srm/dashboard/setup. If Smart Report Maker is being installed locally on the same machine, use localhost or 127.0.0.1 instead of domain_name.
Note: If you encounter an error, try the following URL instead:
https://your_domain_name/path-to-your-Installation-Directory/srm/dashboard/public/index.php/setup
8- After successfully launching the web installer, click here to proceed with the installation.
 Smart Report Maker Installation on Linux
1- Ensure that all steps in the “Preparation for Smart Report Maker Installation” section have been successfully completed.
2- Open your terminal and navigate to the installation directory containing both the “srm” folder and the install.sh script. For example, if the installation directory is /var/www/html, run the following command:
cd /var/www/html3- To grant execute permission to the install.sh script and set 755 permissions for the “srm” directory, use the following combined command:
sudo chmod +x install.sh && sudo chmod 755 -R srm4- Verify that the “srm” directory and the install.sh script have the correct permissions by running the following command:
ls -ahl5- Once you run the installer, it will perform the following tasks:
- Check if Git is installed. If Composer is available, it will use it; otherwise, it will install Git and its dependencies.
- Execute all necessary commands to install Smart Report Maker’s dependencies using Composer.
- Create the necessary symbolic links (soft links).
- Create a cron job for sending scheduled reports.
- Adjust the directory permissions as required.
To run the installer, use this command:
./install.sh6- Installation Execution
- For Apache Users: The installer will complete all tasks mentioned in step 5 and display a success message with zero errors.
- For Nginx Users:
- The installer will complete all tasks listed in Step 5.
- If both Nginx and Apache are detected on the server, the installer will prompt you to choose which web server to use.
- If the script cannot locate the PHP-FPM (FastCGI Process Manager) path, it will ask you to provide it.
- You may be asked to confirm the installation directory. For example, if your “srm” directory is located at
/var/www/html/srm, your web root should be/var/www/html/. - The installer will generate an Nginx configuration file for Smart Report Maker and prompt you to review or modify it to avoid conflicts with existing sites.
- You will be given the option to either manually copy the configuration file to the Nginx configuration directory (usually found at
/etc/nginx/conf.d/) or let the installer copy it for you automatically. - The script will test the Nginx configuration and reload Nginx to apply the changes.
7- Once the installer finishes and displays a success message with zero errors, delete the installer script by running the following command:
rm -f install.sh8- Open your preferred web browser and navigate to https://domain_name/path-to-installation-directory/srm/dashboard/setup if you’re using Apache, or https://domain_name/srm/dashboard/setup for Nginx. However, If Smart Report Maker is being installed locally on the same machine, use localhost or 127.0.0.1 instead of domain_name.
Note: If you encounter an error, try the following URL instead:
https://your_domain_name/path-to-your-Installation-Directory/srm/dashboard/public/index.php/setup
9- After successfully launching the web installer, click here to proceed with the installation. If you encounter any issues during the installation process, click here for assistance.