In Smart Report Maker, effective group management is essential for organizing user access and permissions. Every user must belong to a group, making it necessary to start by creating at least one group before adding users. This ensures a structured way to control access to both public and private resources, such as reports, charts, and KPIs. This article will walk you through the importance of groups, the types of permissions available, and the step-by-step process to manage groups and assign appropriate access levels.
Why Groups Matter in Smart Report Maker
Groups allow you to manage which users can access or modify private resources, such as reports and KPIs. Without a group, users cannot be created, and they will lack access to any non-public content. Each group comes with:
- A unique name
- A set of permissions to define the group’s abilities
Permissions in Smart Report Maker control whether users can:
- Access private reports, charts, and KPIs:
- Public resources are accessible to anyone, including non-logged-in users. This is helpful for embedding charts or reports on websites for open access.
- Private resources, however, are only accessible to users belonging to groups that have permission.
- Create new reports, charts, and KPIs:
- Only Admins and users in groups with “Create” permissions can create new reports, charts, and KPIs.
- Without this permission, users can view and interact with resources but cannot create new ones.
- Edit resources:
- Only the creator of a resource or an Admin can edit resources.
How to Create and Manage Groups
Creating a new group and assigning permissions in Smart Report Maker is simple. Follow these steps:
- Navigate to User Management:
- Go to Settings from the main menu and select Users.
- Go to Settings from the main menu and select Users.
- Add a New Group:
- On the User Management page, select the “Groups” tab, then click the “Add New Group” button
- On the User Management page, select the “Groups” tab, then click the “Add New Group” button
- Define Group Permissions:
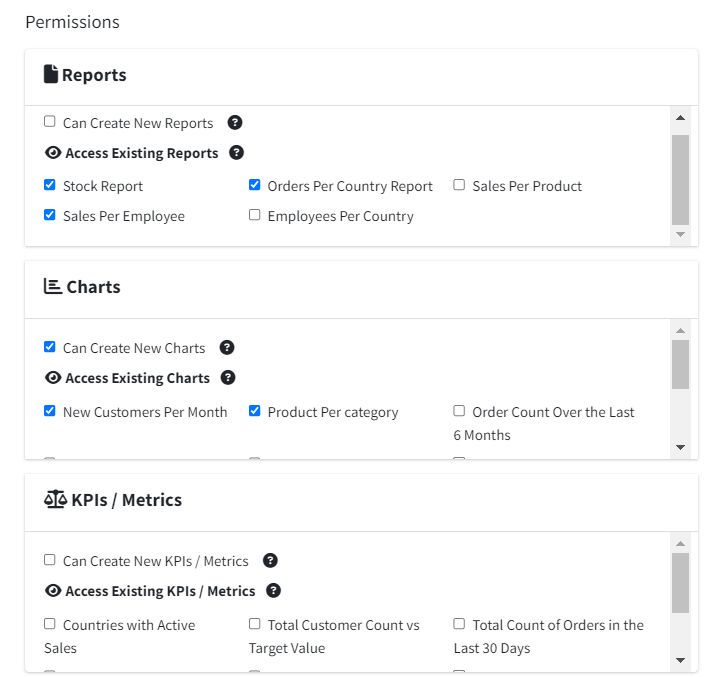
When creating the group, you can customize permissions to fit your organizational needs:- Creation Permissions:
- By checking the following boxes, users in the group will be allowed to create new reports, charts, or KPIs. If you don’t want to grant this permission, be sure to leave these boxes unchecked:
- “Can Create New Reports”
- “Can Create New Charts”
- “Can Create New KPIs / Metrics”
- By checking the following boxes, users in the group will be allowed to create new reports, charts, or KPIs. If you don’t want to grant this permission, be sure to leave these boxes unchecked:
- Access Permissions:
- Select which existing reports, charts, and KPIs the group members can access by checking the appropriate resources.
- For future private resources, you can assign group access during the creation process of that report, chart, or KPI.
- Creation Permissions:
- Save the Group:
- Once you’ve configured the group name and permissions, click Save.
- Wait for the success message to confirm that the group has been created.
Conclusion
Groups in Smart Report Maker are crucial for maintaining control over who can access, create, and edit resources. By carefully setting up groups and permissions, you can ensure that users only have access to the data they need, while also keeping sensitive information secure. Start by creating your first group, assign the necessary permissions, and manage user access with ease!

