Adding Smart Report Maker Reports and Dashboards to an AppGini Application
AppGini provides a fast and reliable way to generate complete PHP applications , with authentication, user management, and data handling already in place. This makes it an excellent foundation for building data-driven applications while keeping development focused on business requirements. Smart Report Maker fits naturally into this setup by adding a dedicated layer for dashboards, charts, pivot tables, and analytical reports. It allows you to design rich, interactive analytics based on the same database used by the AppGini application and manage them centrally in one place.
In this tutorial, we assume that you have a PHP application generated using AppGini, where users authenticate through the AppGini login system and work with data stored in a MySQL database created and managed by AppGini. If you haven’t purchased AppGini yet, use this link to get a 25% discount.
We also assume that you have Smart Report Maker (SRM) installed on your server. (For the easiest way to install SRM, click here.)
The goal of this tutorial is to allow end users to log in once through the AppGini application and securely view their reports, charts, and dashboards directly inside the AppGini interface, without requiring a separate login to Smart Report Maker.

Step 1: Create the Database Connection
Since AppGini applications are fully database-driven, the first step is to connect Smart Report Maker to the same MySQL database used by the AppGini application.
In Smart Report Maker, go to Settings → Data Connections and create a new connection that points to your AppGini database. This allows Smart Report Maker to access the same tables, relationships, and data used by your AppGini application. Your connection details are stored securely in the SRM database in an encrypted format.
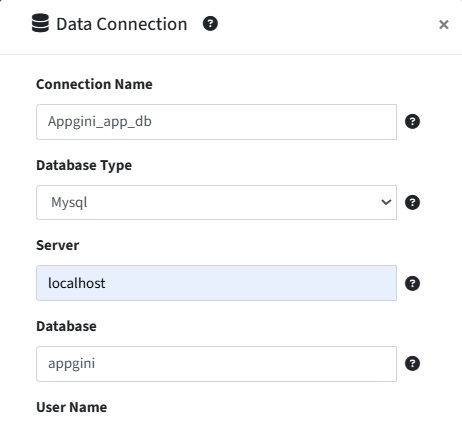
Adding a connection to your AppGini application’s MySQL database in SRM.
Step 2: Create a Group for the Application
Create a group that represents your AppGini application or the category of users who should have access to its analytics. This group will later be used to control which reports, charts, KPIs, pivot tables, and dashboards can be accessed or embedded.
By using a dedicated group, you establish a clear boundary that ensures analytics created for your application remain isolated and easy to manage as the system grows.
To create a group, go to Settings → Users, then select the Groups tab. Give this group a familiar name that references your AppGini application.
Step 3: Create your resources (Report, Chart, KPIs, Pivot Tables, and Dashboards)
With the database connection and group in place, you can now start creating analytics in Smart Report Maker.
For each type of analytic, you’ll find a dedicated section in SRM. Use the side panel to choose Reports, Charts, Pivot Tables, or KPIs to start creating your first resource.
Make sure to select the database connection created in Step 1 as the data source. Then set the resource to Private and grant access to the group you created in Step 2.
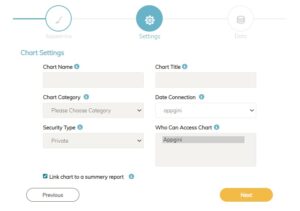
Creating a chart in SRM using an AppGini application’s database as the data connection,
and assigning it to a group created specifically for that AppGini application’s resources.
Please note that this tutorial is meant as a quick example to help you get started. You can always add more resources, charts, and reports to your AppGini application later as your needs grow. For more advanced use cases and detailed configuration options, we recommend checking the full Smart Report Maker documentation here.
Step 4: Create an Access Key for the AppGini Application
Once reports, charts, KPIs, pivot tables, and dashboards are created and assigned to the appropriate group, the next step is to configure Smart Report Maker for secure embedding inside the AppGini application.
Embedding analytics requires an access key, which acts as a controlled gateway between Smart Report Maker and the AppGini application. The access key defines which resources can be embedded, which permissions apply, and from which website the embedding is allowed.
To create an access key, go to Access Control → Embed Manager and choose to create a new access key.
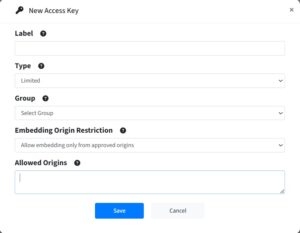
Creating an Access Key in Smart Report Maker for the AppGini Application
- Start by assigning a Label. This is a friendly name used only for reference and management purposes, such as “AppGini Application – Embed Key”. The label does not affect security but helps identify the key later.
- Next, select the Type of access key. For this use case, the type should be set to Limited. A limited access key is restricted to specific group permissions and is the recommended option when embedding analytics into applications. The full access type is not suitable for multi-resource or multi-application environments.
- After that, select the Group associated with the access key. This should be the same group created earlier for the AppGini application. By linking the access key to this group, the key inherits the exact permissions defined for that group and can only be used to embed the reports, dashboards, and analytics assigned to it.
-
Finally, configure the Embedding Origin Restriction. If the AppGini application is hosted on the same website as Smart Report Maker, restrict embedding to the same origin. If the AppGini application is hosted on a different website (such as https://example.com), explicitly define that website as an approved origin. This ensures that embedded analytics can only be loaded from the AppGini application itself.
Step 5: Add AppGini Integration Code Once Using Embed Preferences (So It Applies to All Embed Files)
Before generating embed files, it’s best to add your shared integration code in one central place. Smart Report Maker provides Embed Preferences, which lets you define PHP code that will be injected automatically into every embed file you generate. This is ideal when you want all embedded dashboards, reports, and charts to behave like native AppGini pages.
Go to Embed Manager → Embed Preferences and locate the following fields:
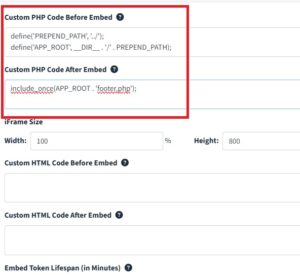
Custom PHP Code Before Embed
In this field, you’ll add two key integrations:
First, include AppGini’s lib.php so the embed file can use AppGini functions and authentication utilities. AppGini’s documentation recommends defining PREPEND_PATH and APP_ROOT then including lib.php for custom pages.
Second, enforce AppGini authentication. If the visitor is not logged in, redirect them to the AppGini login page. AppGini provides Authentication::isGuest() for detecting guest users.
After confirming the user is logged in, include AppGini’s header.php so the embedded page uses the same navigation and theme. AppGini documents this approach for integrating custom pages into the standard application layout.
Do not include the PHP opening and closing tags (<?php and ?>) because they are already present in the embed files. You can simply copy and paste the code below into the appropriate section for integration.
// AppGini integration (shared across all SRM embed files)
// Adjust PREPEND_PATH if your embed files are not inside AppGini's "hooks" folder.
// If embed files are in "hooks/", this is typically '../'
define('PREPEND_PATH', '../');
define('APP_ROOT', __DIR__ . '/' . PREPEND_PATH);

// Load AppGini core
include(APP_ROOT . 'lib.php');

// Enforce login (redirect guests to login page)
if(Authentication::isGuest()) {
// AppGini login URL commonly uses signIn=1
header('Location: ' . PREPEND_PATH . 'index.php?signIn=1');
exit;
}

// Include AppGini header (navigation + theme)
include_once(APP_ROOT . 'header.php');
Custom PHP Code After Embed
In this field, you’ll include the AppGini footer so the embedded analytics page renders like a complete AppGini page.
Add this code inside Custom PHP Code After Embed:
include_once(APP_ROOT . 'footer.php');
This header/footer pattern is exactly how AppGini recommends integrating custom pages into the application layout.
Step 6: Generate and Review the Embed Files
After configuring Embed Preferences and creating the access key, you can now generate the actual embed files for your analytics resources.
Go to Embed Manager → Embed Resources, then:
-
Select the resource type (Report, Chart, KPI, Pivot Table, or Dashboard).
-
Choose the specific resource you want to embed inside your AppGini application.
-
Select the access key created in Step 4 so the embed file inherits the correct permissions and origin restrictions.
-
Choose the Embed Type and select PHP Embed.
Smart Report Maker will generate a native PHP embed file for each selected resource. These files are the integration point between Smart Report Maker and your AppGini application.
Once the files are generated, it’s a good practice to open them in a text editor and review their contents. Because Embed Preferences were configured in Step 5, you will see that the AppGini authentication checks and header/footer inclusion are already injected automatically.
At this stage, you may optionally customize individual embed files further if you have resource-specific logic, layout adjustments, or conditional behavior that applies only to a particular dashboard or report. This step is not required for most use cases, but it gives you flexibility if certain analytics need special handling.
Step 7: Add the Embed Files to Your AppGini Application and Include Them in the Menu
According to the AppGini documentation, custom pages should be placed inside the application’s hooks folder or a subfolder beneath it. This ensures the files remain easy to maintain and do not get overwritten if you regenerate the application using AppGini’s project builder. So, copy your generated embed PHP files into your AppGini app’s hooks directory (for example: myapp/hooks/srm-resource-embed-file.php).
Next, If you want the embedded analytics pages to appear on your AppGini Application’s home page, open the following file:
hooks/links-home.php
Inside hooks/links-home.php, you will find a PHP array called $homeLinks. This array defines the links that appear on the application’s home page.
To include your embedded Smart Report Maker pages there as well, append new entries to the $homeLinks array using the same approach. This allows users to access dashboards and reports directly from the home page.
<?php
// Smart Report Maker embedded analytics pages on home page
$homeLinks[] = array( 'url' => 'hooks/srm-resource-embed-file.php',
    'title' => 'Dashboard',
    'description' => 'A dashboard created by SRM',
    'groups' => array('*'), // groups allowed to see this link, use '*' to show the link to all groups

);
In the previous code
These fields are required for the home page link to work correctly:
- url
The relative path to the Smart Report Maker embed file inside your AppGini project. - title
The text that appears as the link title on the home page. - description
A short description shown below the title. This helps users understand what the dashboard or report contains. - groups
Controls which AppGini user groups can see this link.
Usearray('*')to make the link visible to all logged-in users, or list specific group names to restrict visibility.
Optional Fields
These fields are optional and are mainly used for layout, styling, and organization:
- grid_column_classes
Optional Bootstrap grid classes that control the width and layout of the link block on the home page (for example:col-md-6orcol-lg-4). - panel_classes
Optional CSS classes applied to the panel container that wraps the link. Useful for styling or adding color themes. - link_classes
Optional CSS classes applied to the clickable link itself. Commonly used to style the link as a button. - icon
Optional icon to display next to the link. This can be an image path or an icon class, depending on your AppGini theme. - table_group
Optional grouping label that AppGini uses to organize home page links under a named section.
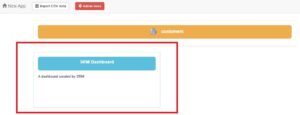
A dashboard generated by SRM is embedded
on the AppGini application’s home page.
Similarly, to include the embed files in the application’s navigation menus so users can open dashboards, reports, and analytics directly from the AppGini interface. To do this, open the following file in your AppGini application:
hooks/links-navmenu.php
Inside hooks/links-navmenu.php, you will find a PHP array called $navLinks. This array defines the items that appear in the application’s navigation menu.
To add your embedded Smart Report Maker pages to the menu, you simply append new entries to the existing $navLinks array. For each dashboard, report, or analytics page you want to expose in the menu, add one entry similar to the following.
// Smart Report Maker embedded analytics pages
$navLinks[] = array(
    'url' => 'hooks/srm-resource-embed-file.php',
    'title' => 'Analytics Dashboard',
    'groups' => array('*'),
    'icon' => ''
);
You can repeat this block for each embedded report, chart, or dashboard you generated in Smart Report Maker.
After saving hooks/links-navmenu.php, reload your AppGini application in the browser. You should now see the new navigation links. Clicking any of them will open the corresponding embedded Smart Report Maker page inside the AppGini layout.
This completes the integration of Smart Report Maker analytics into the AppGini navigation menu.