This page is intended for users who are currently using Smart Report Maker (SRM) version 9.0 or later and are hosting their application on a Linux server managed through Control Web Panel (CWP). If you are using a version older than 9.0, do not follow the steps on this page. Instead, please contact our support team for assistance.
Step 1: Back Up Your Current SRM Installation Using CWP
Before starting the upgrade, it’s essential to back up your SRM system. This ensures that you can restore your data if anything goes wrong during the upgrade.
1.1 Backing Up SRM Files via CWP File Manager
- Log in to your CWP User Panel (or CWP Admin Panel if you have full access).
- Go to File Management → File Manager from the left-hand menu.
- Navigate to the folder where SRM is installed.
- Typically (though not necessarily), it should be located inside a directory such as: /home/your_cwp_username/public_html/path_to_srm/srm
- Right-click (or use the menu options) on the
srmfolder and choose Compress (may appear as Add to Archive). - Select ZIP format, name the file (e.g.,
srm_backup.zip), and confirm. - Once compression completes, download the backup file to your local machine or move it to a secure location on your server.
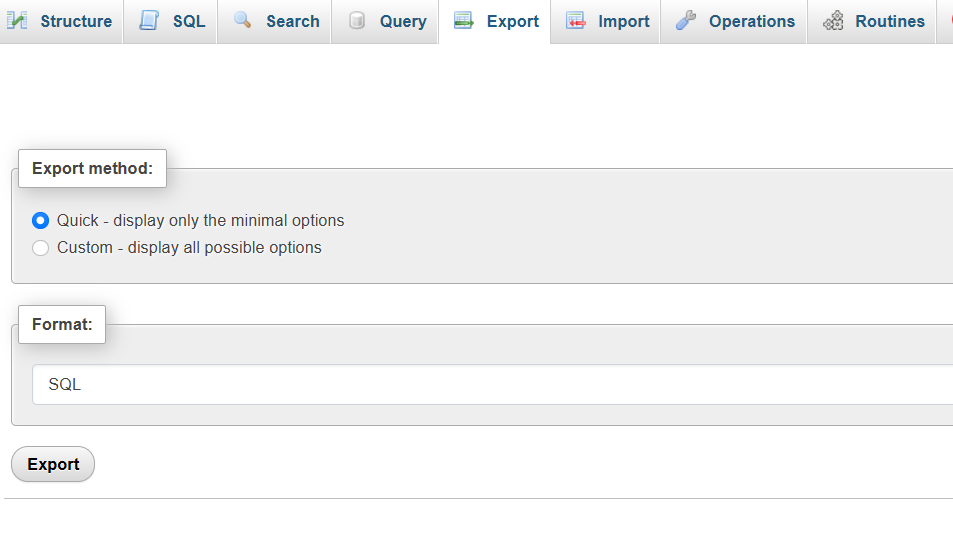
1.2 Backing Up the SRM Database via CWP phpMyAdmin
- In CWP User Panel, go to SQL Services → phpMyAdmin.
- Select the SRM database from the left sidebar.
- Click the Export tab at the top.
- Choose the Quick export method and keep the format as SQL.
- Click Go to download the database backup file (e.g.,
backup.sql) to your local machine.
Once you have backed up both the SRM files and database, you are ready to begin the upgrade process.
Step 2: Rename the Existing “srm” Directory
- In CWP File Manager, locate the
srmdirectory. - Right-click it and select Rename.
- Change the name to
srm_old.
Step 3: Upload the New Version of SRM
Inside the new SRM package (matching your PHP version), you’ll find:
srmdirectory – Contains the new SRM files.install.sh– Used for fresh Linux installations only.install.ps1– Used for fresh Windows installations only.update.sh– Used to update an existing SRM installation on Linux.update.ps1– Used to update an existing SRM installation on Windows.
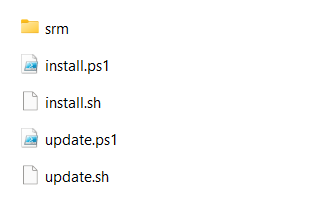
Note: The image shows the contents of the downloaded new version. We only need the srm directory and the update.sh script.
For the upgrade, you only need the new srm directory and the update.sh script.
- In CWP File Manager, navigate to the same directory where your old
srmwas located. - Upload the new
srmdirectory and theupdate.shscript.
Your directory should now look like:
srm_old– the renamed folder of your old SRM versionsrm– the new version’s folder you just uploadedupdate.sh– the script used to complete the upgrade process
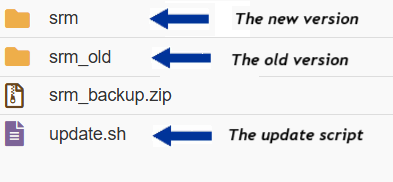
Note: The image shows the renamed old version (srm_old), the newly uploaded version (srm), and the update script (update.sh) placed in the same directory.
Step 4: Set Proper Permissions
- In CWP File Manager, find the
update.shscript.- Right-click it and choose Change Permissions (CHMOD).
- Set it to 755.
- Do the same for the new
srmdirectory. - Ensure
update.shhas execute permission.
Step 5: Execute the Upgrade Script
Step 5.1: Open the Terminal
5.1 Open the Terminal
To execute the update script:
- In CWP User Panel, go to File Management → Terminal (or look under Tools in some CWP themes).
- If the terminal option is not available, connect to your server via SSH using your hosting credentials.
Step 5.2: Navigate to the SRM Directory
In the terminal, you might need to verify your current location by running the following command:
pwdNavigate to the directory that contains the srm folder. You can do this by running:
cd /path_to_srm Replace /path_to_srm with the actual path where “srm” directory is located.
Step 5.3: Verify the Presence of the Update Script
Verify that the update.sh script, along with the srm and srm_old directories, are present in the current directory by running the following command:
ls -ahlNote: You should see update.sh listed in the output as well as the “srm” directory.
Step 5.4: Run the Update Script
To start the upgrade process, run:
bash update.shif you encounter an issue due to permissions you can try the following command instead:
sudo chmod +x update.sh && bash update.shAs an alternative, you can run this command:
sudo chmod +x update.sh && ./update.sh
Step 6: Validate the Updated Version
Log in to your SRM system using the same URL and your existing credentials.
You should see all your data exactly as it was, now enhanced with the new features included in the latest version.
To confirm the version number, click the About icon located in the top-right toolbar.
Step 7: Clean Up After a Successful Upgrade
Once you’ve confirmed that the upgrade was successful:
- You may safely delete the following items:
srm_old(the renamed old version)existed_resources(temporary update files)update.sh(The updating script)
These files and folders should be located at the same directory level as the srm folder.
⚠️ Important: Do not delete the backup you created in Step 1. Keep it stored securely in case you need to restore your system in the future.
If the Upgrade Was Not Successful
If something went wrong during the upgrade:
- Check the
update.logfile for detailed error messages. - Review the
.progressfile to see how far the process went.
Summary
You can upgrade SRM 9.0 or later to the latest version by:
- Backing up files and database via CWP File Manager and phpMyAdmin
- Renaming the old version
- Uploading the new version and
update.shscript - Setting proper permissions
- Running the automated update.sh script
- Validating and cleaning up after success